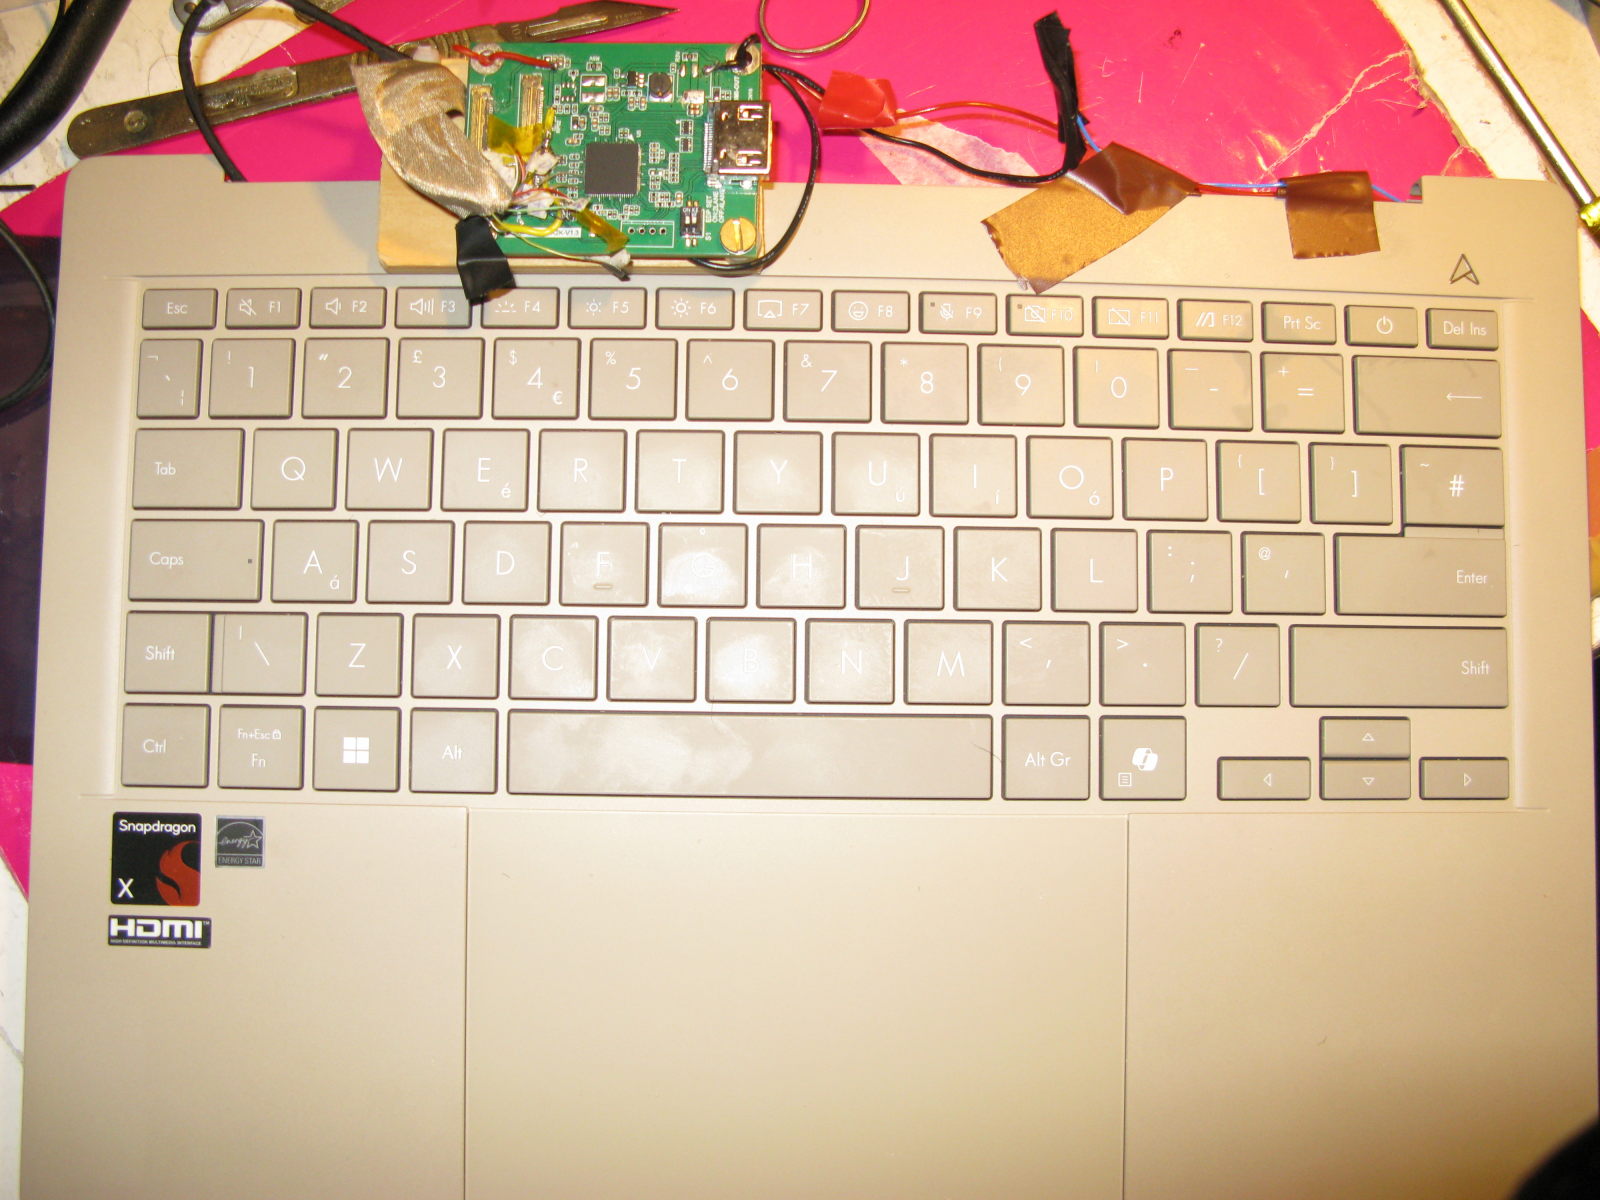
I bought a pair of Snapdragon (64bit arm) laptops off an auction site, with broken displays. This page documents the fun with getting them running Linux - which is a lot harder on arm than PCs. The model of the machines I have are the Asus Zenbook A14 (UX3407QA-QD219W) with an 8 core CPU (Snapdragon X X1-26-100) 16GB of RAM, and 512GB NVMe. The NVMe is M.2 socketed, very little else is.
I bought them for about £150 each, from a traditional auction site, which included delivery and steep auction fees. The original cost is around £800, although they're the lower end of the range and the range has now moved onto newer models of CPU etc.
Given the labelling, I think they're ex-display from a UK retailer. There have been quite a few for sale with broken displays which makes me think the design of the display and lid just isn't strong enough.
With the current cost of RAM and SSD, I thought getting a 512GB SSD and good Type-C charger for the money wouldn't have been a terrible outcome, and with 16GB of RAM and a reasonable CPU it worked out pretty great once I got it going. Since the RAM is soldered to the board, it's less tempting for people just to parts salvage.
The first one I bought I named dragon and the second soup
The display was completely dead on both machines I received, but with the caps-lock LED
responding to key presses I knew there was some life in it. Examination of the display
panel showed a bunch of cracks, starting near the hinge:
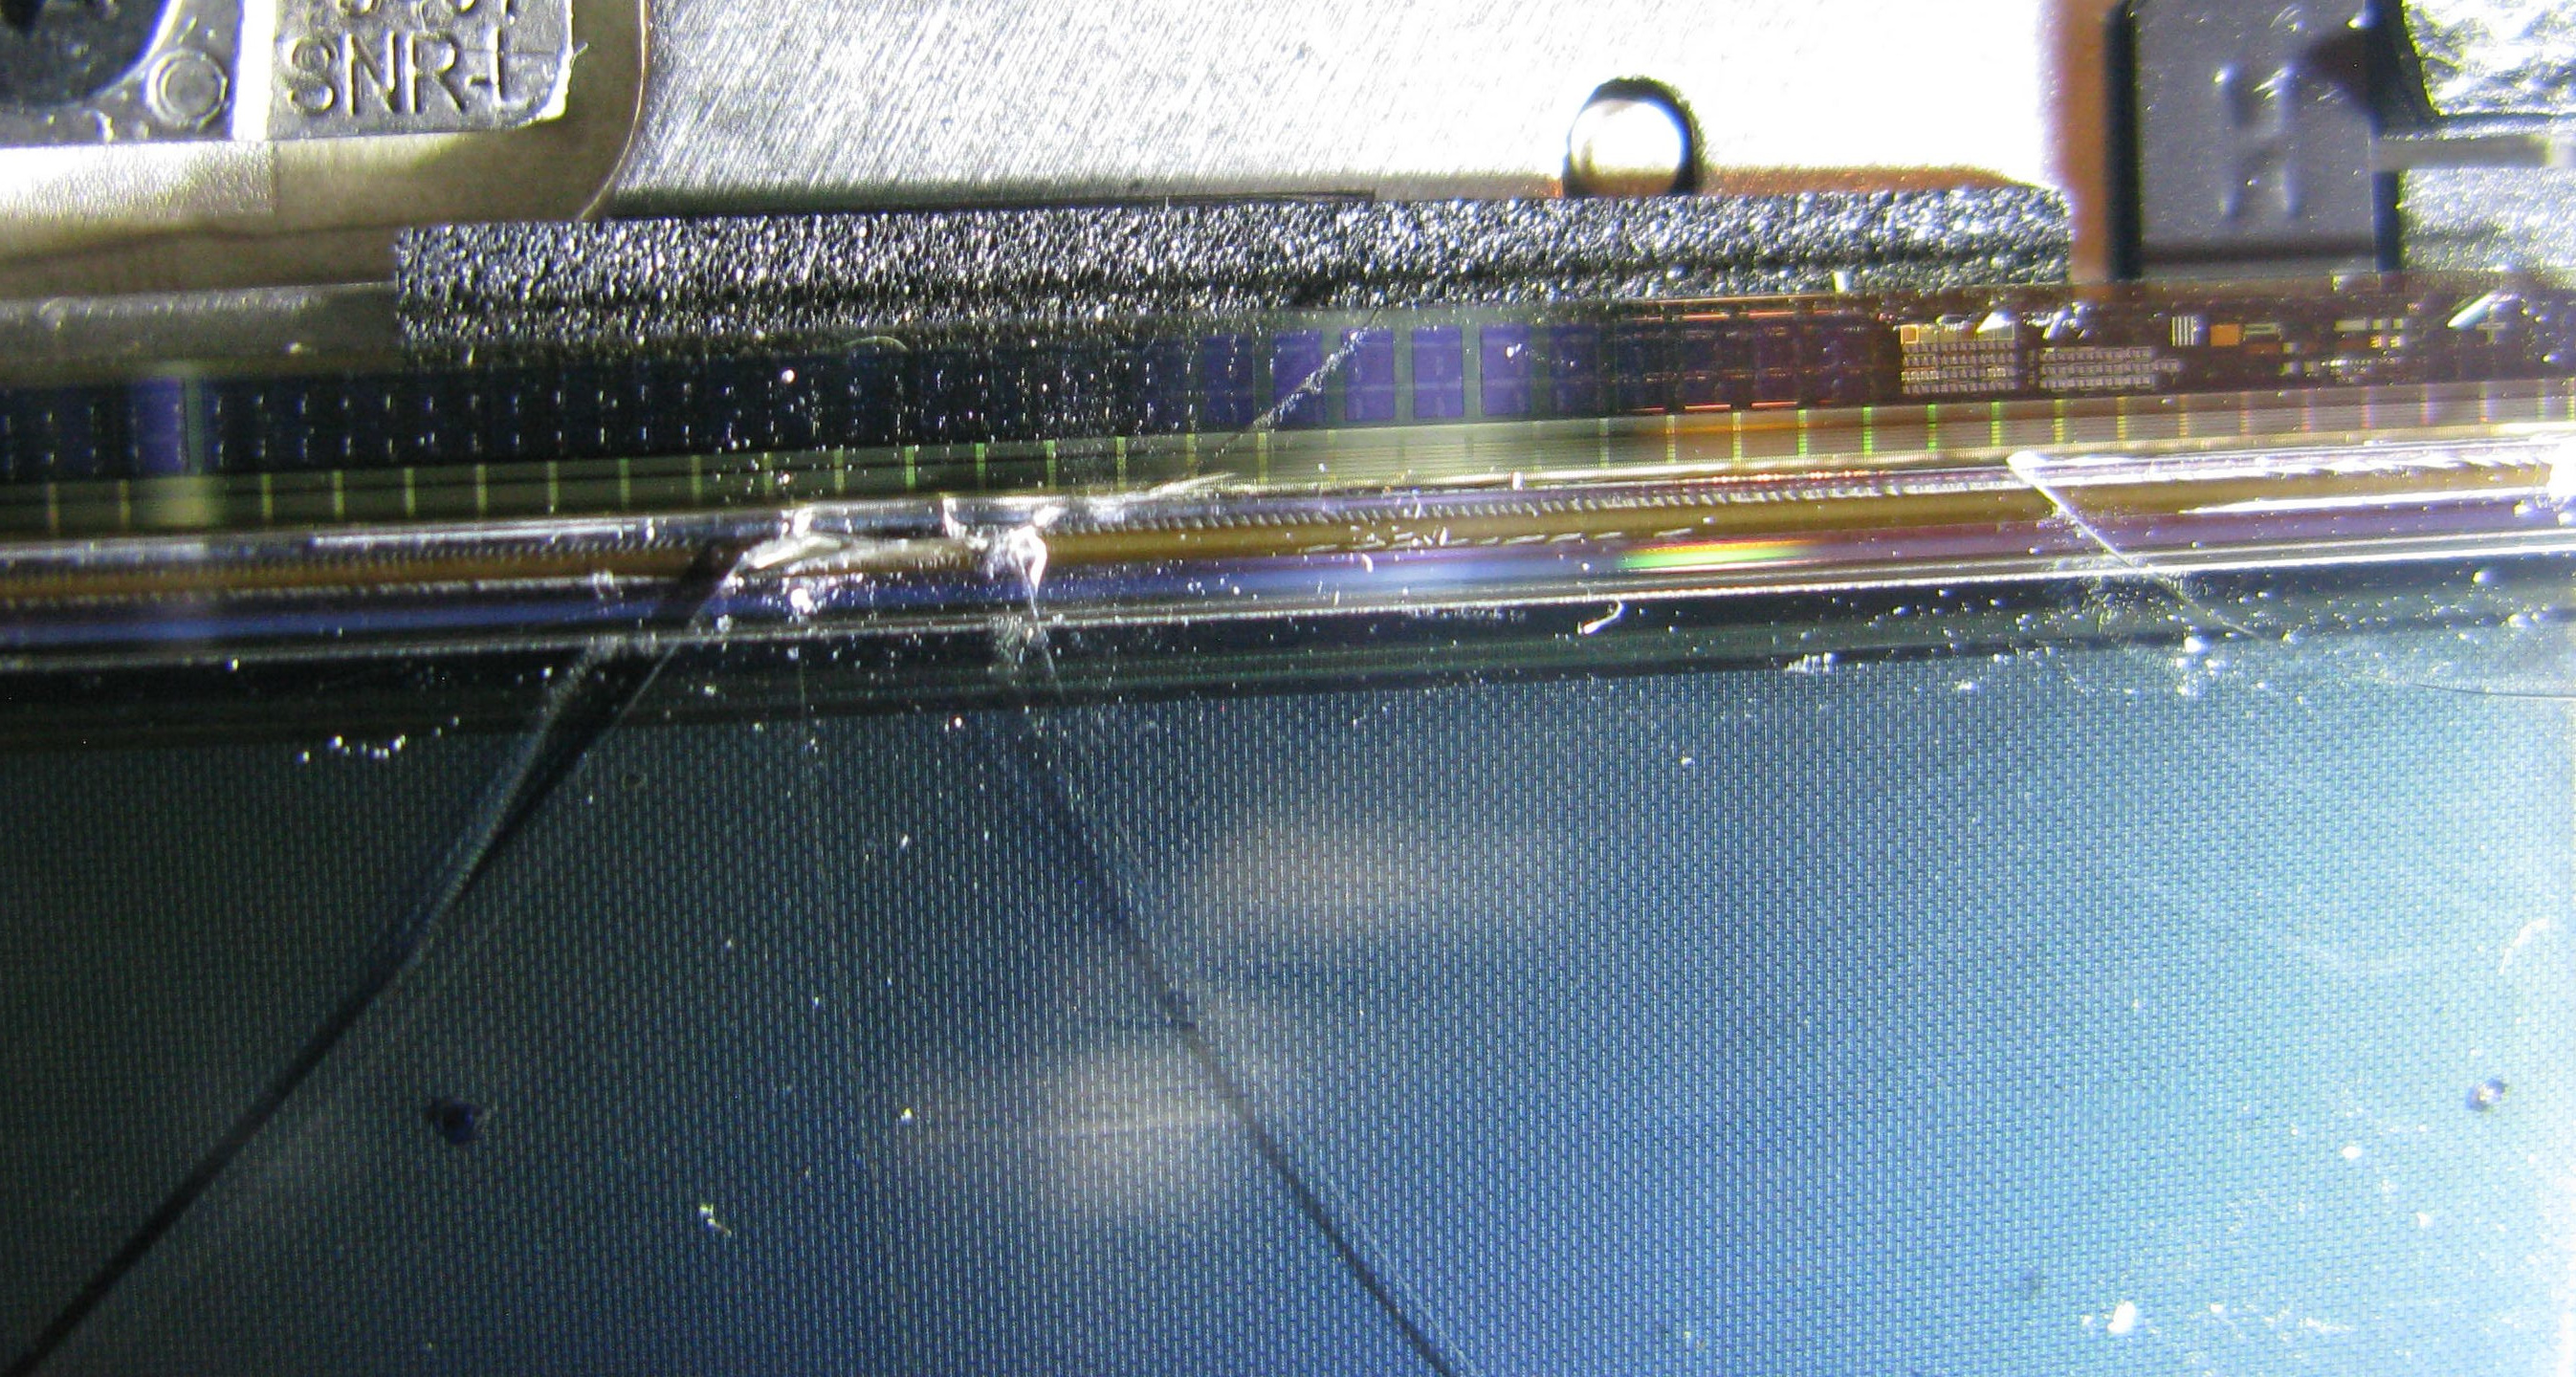
No amount of poking, prodding etc got any life out of it. The display is an OLED panel, (Samsung ATNA40CT06-0), which costs about £150 to buy, and I wasn't that confident I could succesfully replace it without breaking it.
A whole new lid (with camera, and wifi antenna) is apparently around £300. I guess these costs are why they't auctioned off cheap.
Note that Asus have a great service manual which tells you how to dismantle it, alas to get to the panel you have to get the top panel off, which requires taking the cables to the wifi off which requires taking the heatsink off. Lots of smalls screws!
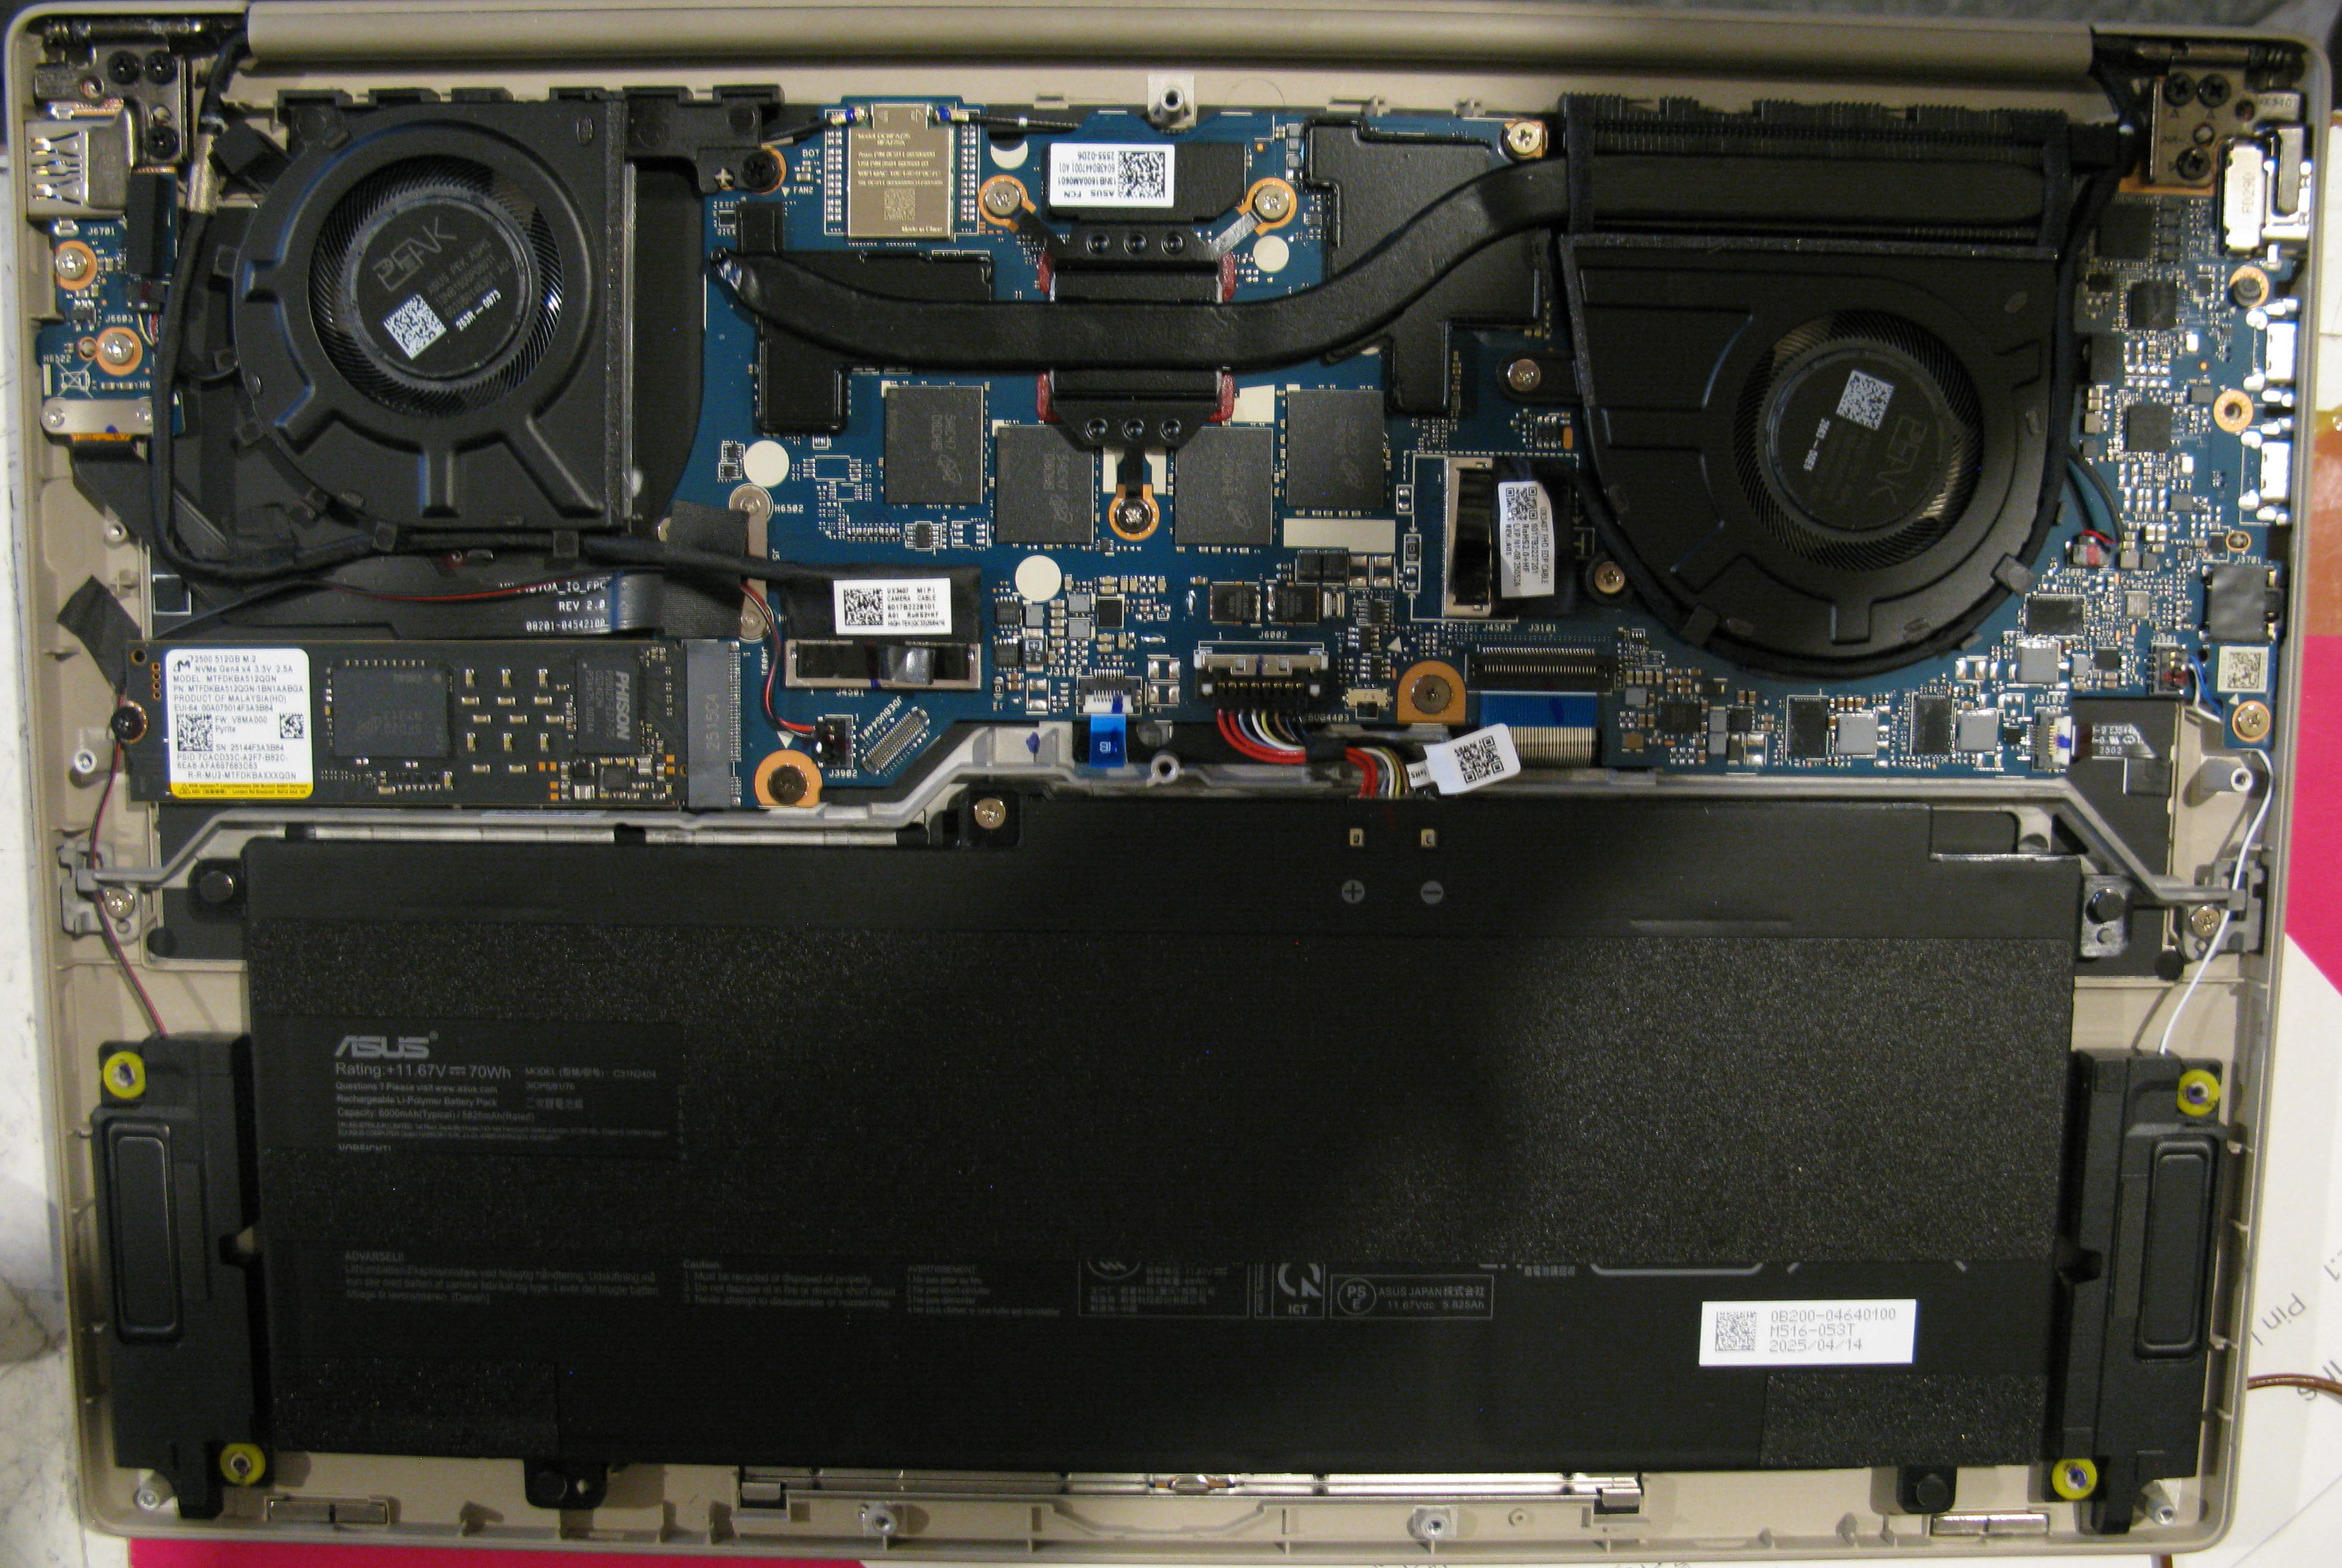
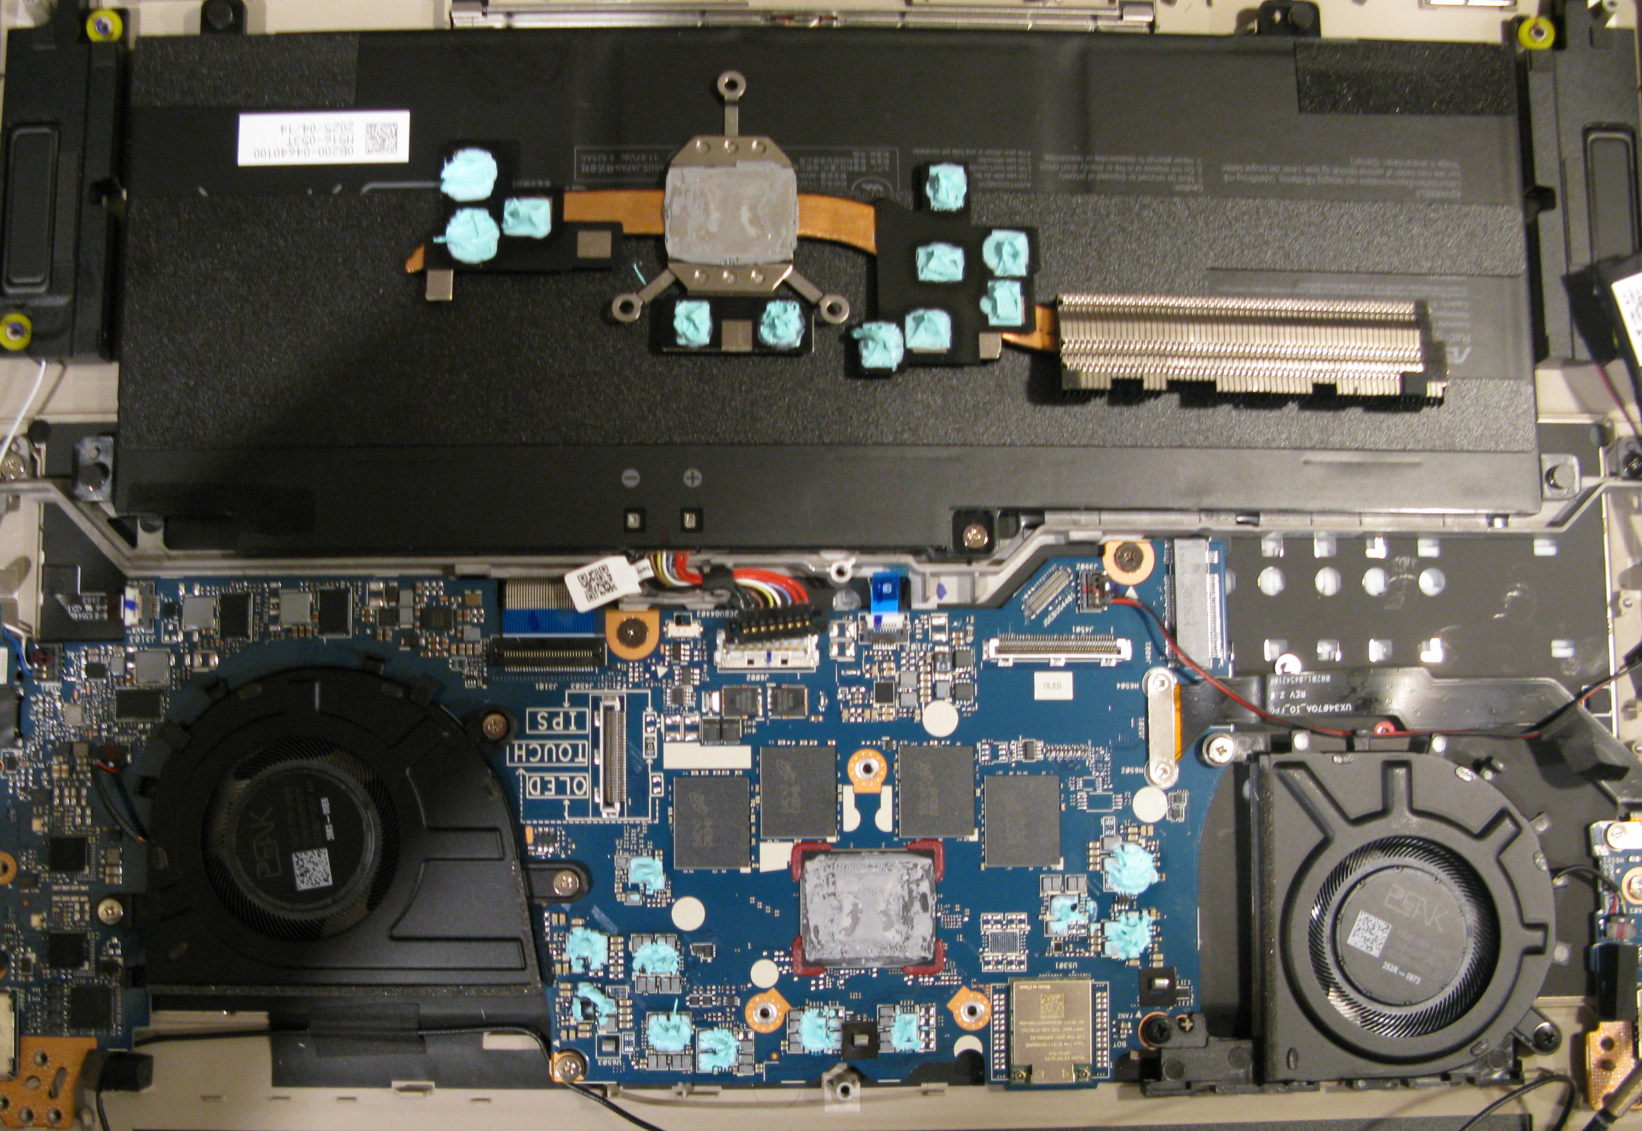
On a PC laptop you might just ignore the display and plug an HDMI cable in and use it like that - which is what I had hoped, but alas the firmware doesn't bother to configure the HDMI and it wasn't apparently booting anything off the included drive. Since boot attempts with a USB stick also failed (and I couldn't find anything useful like serial on the board) I had to get the display somehow.
(I also tried seeing if I could find a more analogue display signal on the back of the scope but failed to find anything useful)
The panel connector is a 30pin standard-ish embedded display port connector. The converter boards are easily available
on eBay (albeit with very little documentation and on slow shipping from China) - just make sure you get EDP input to HDMI output, NOT the opposite which
are used for converting a panel into a monitor. Before ordering I verified that the board supported the 30 pin edp plug:
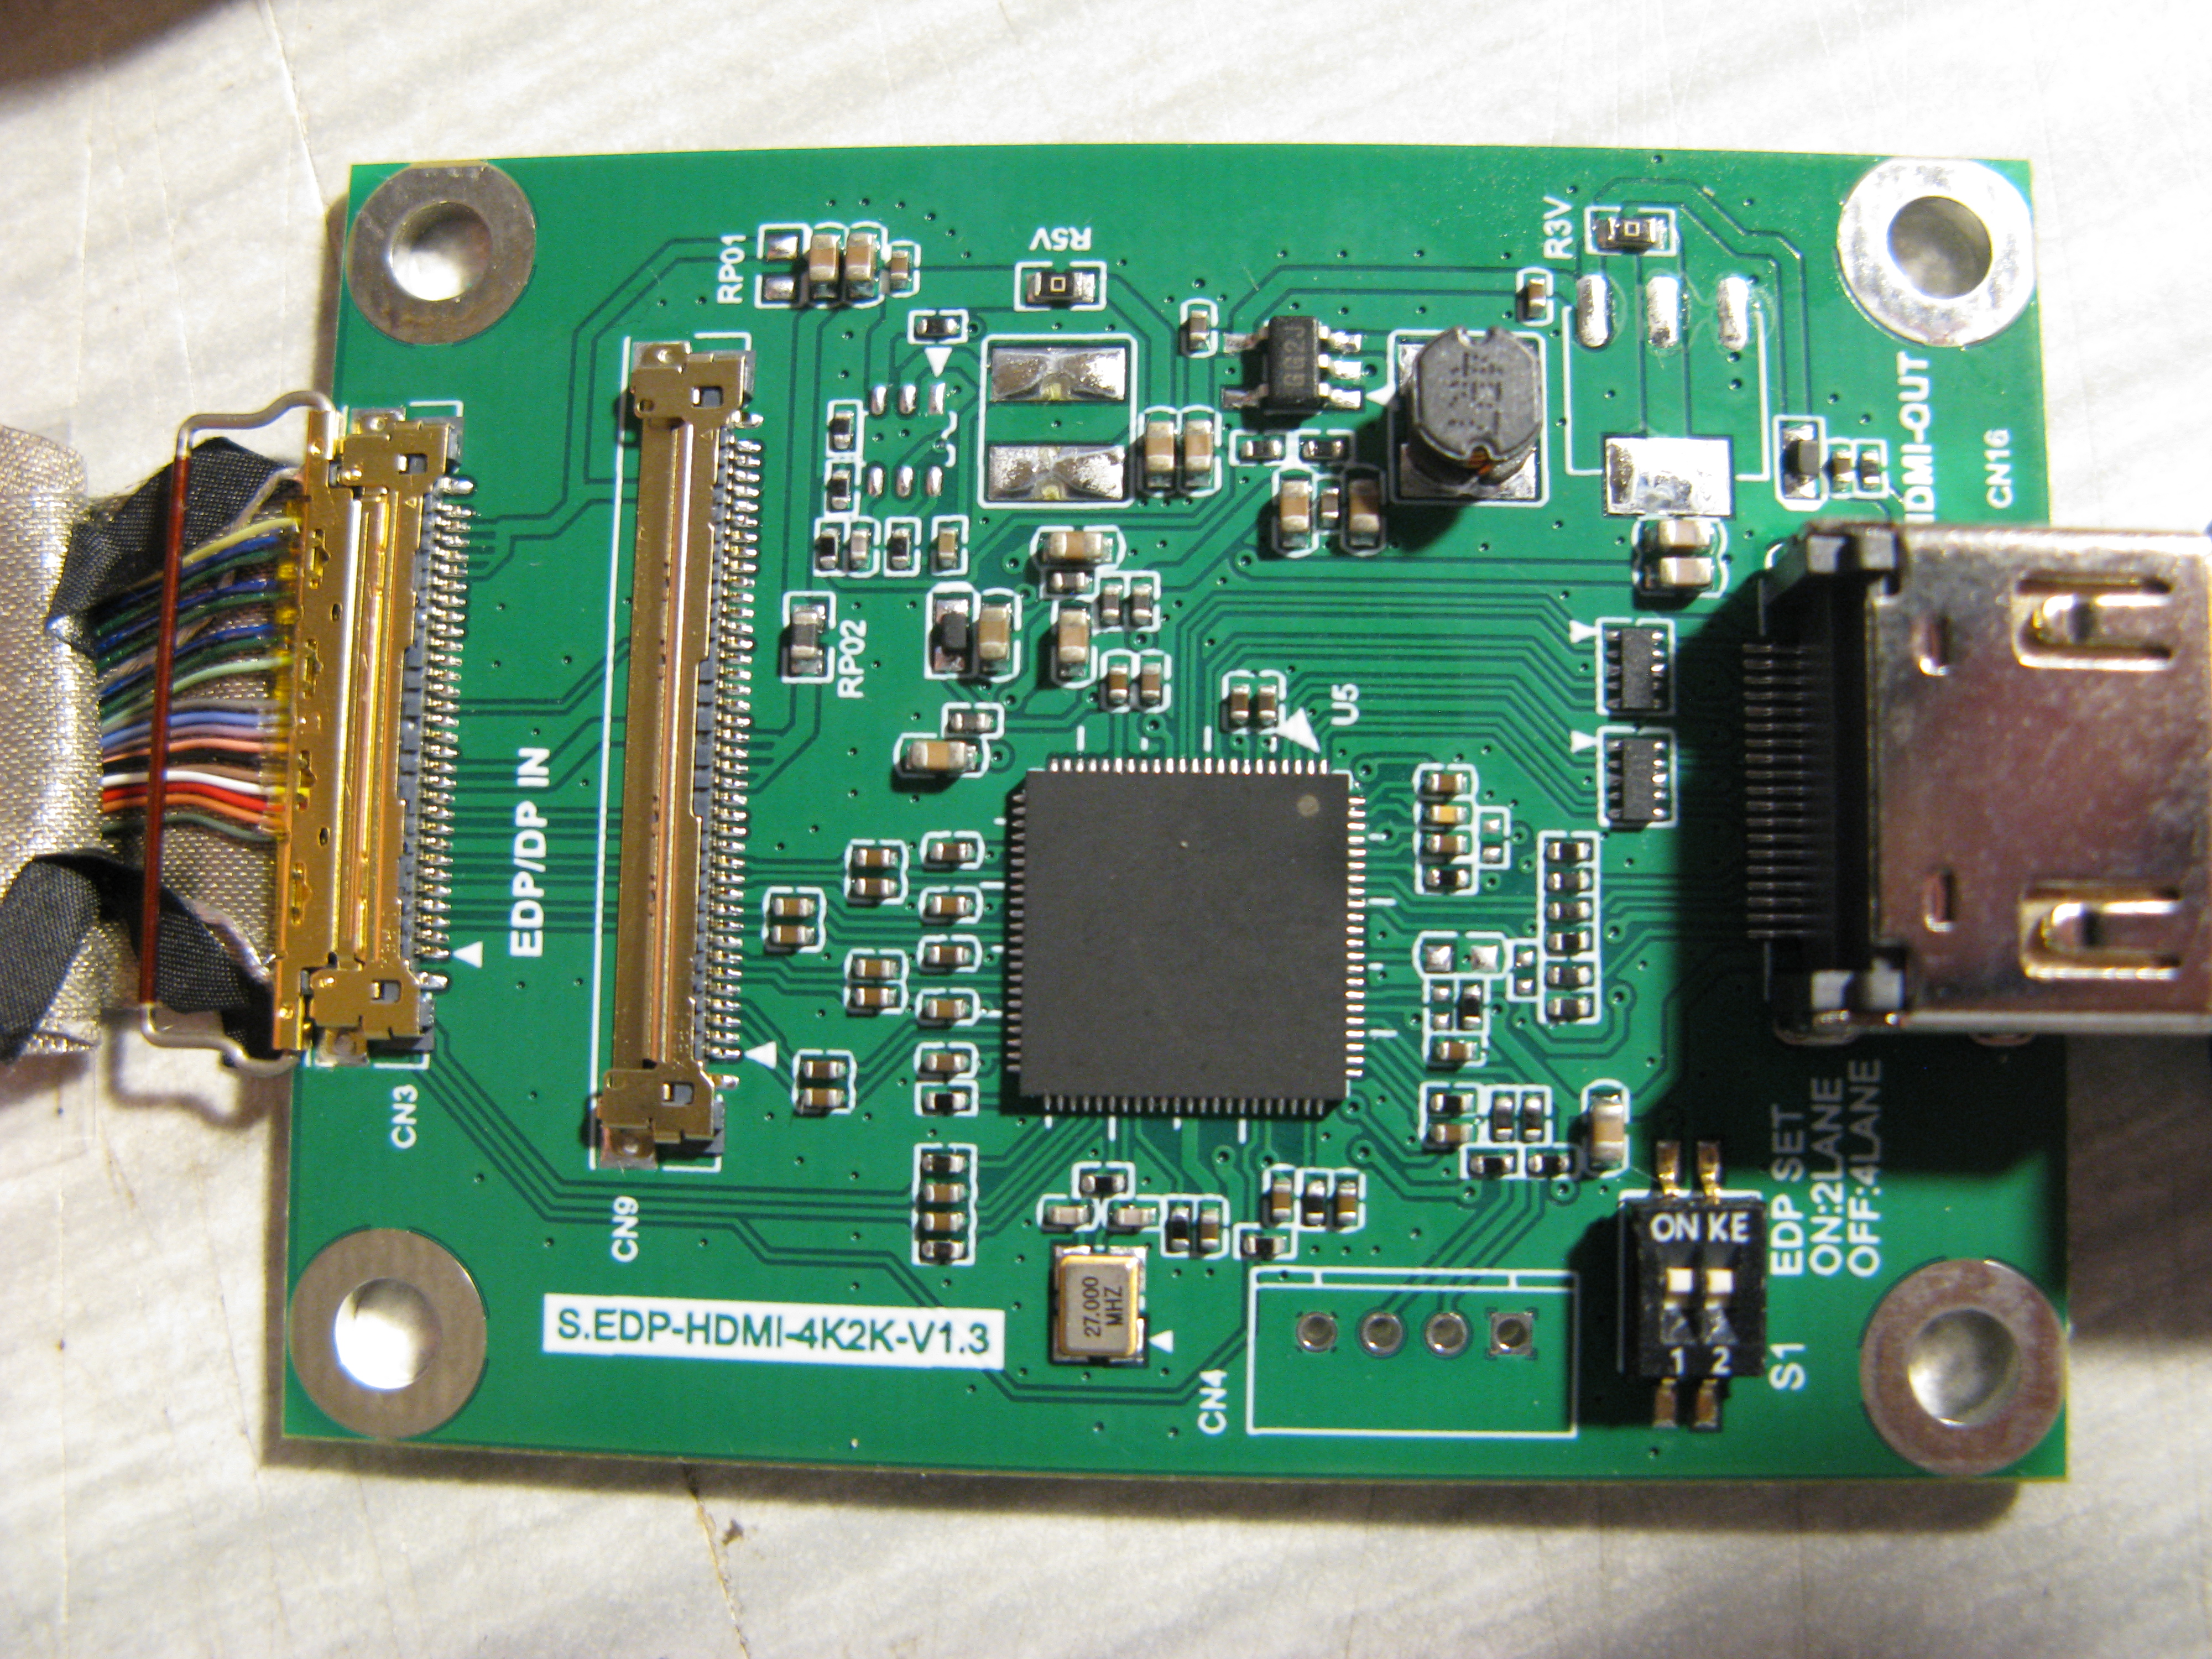
This looks very promising, with the connector from the Asus on the left - but gave no output. After a lot of examination
and careful swearing, I noticed that most of the traces on the board to the eDP connector were at the opposite end to most of the
wires in the connector from the laptop. It turns out that while 30pin EDP connector wiring is pretty standard, except a few
vendors, notably Samsung OLEDs have it reversed.
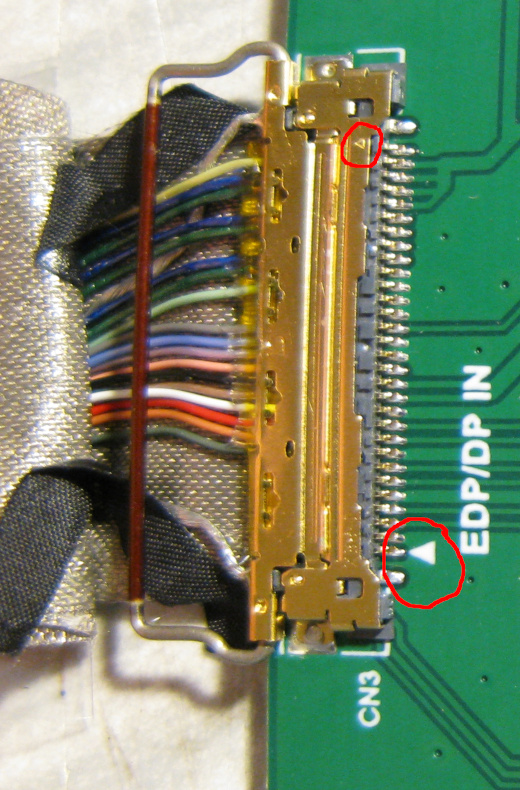
I tried removing and reversing the connector, but at 0.5mm gap it's pretty hard, so I sacrificed the connector and soldered the wires onto individual points on the eDP board. This was easy enough for the digital signals, but the high-bandwidth digital signals are actually pico coax:
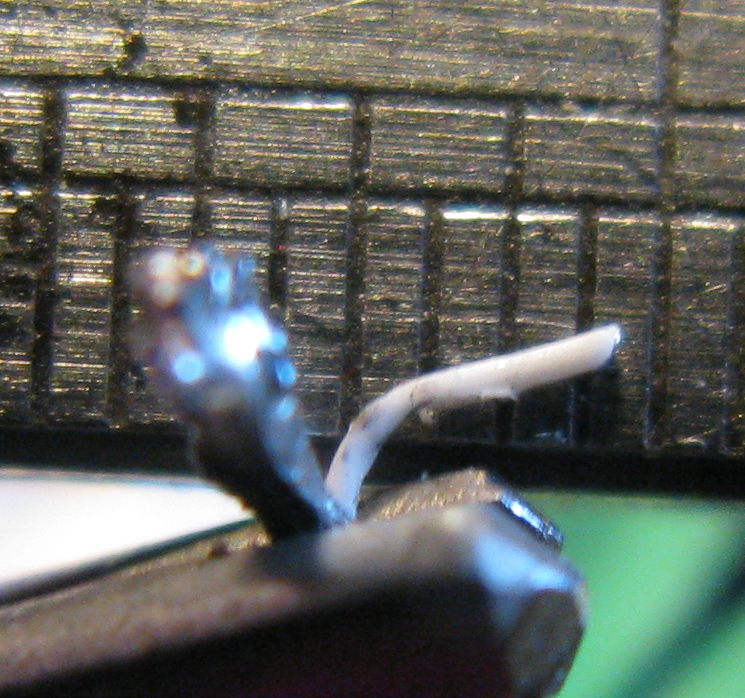
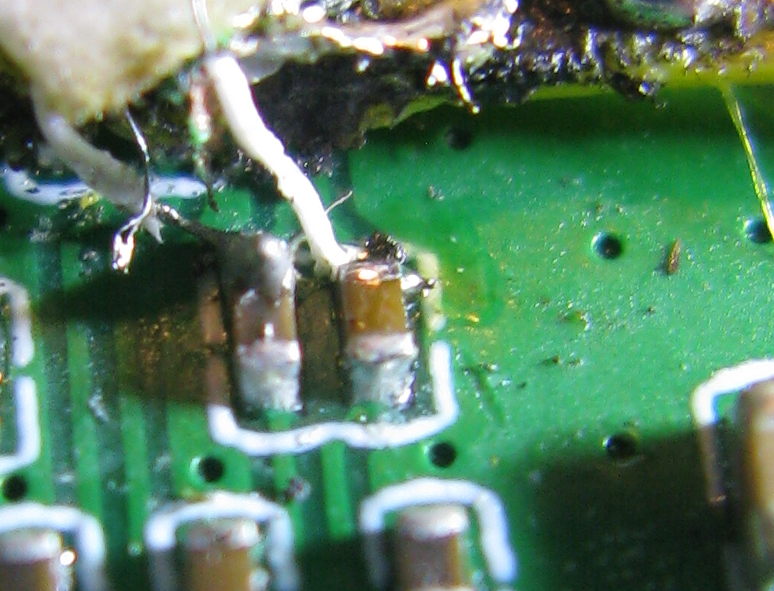
The left hand photo shows one coax with the shield tinned and the inner core still covered in its white insulation. The ruler marks are 0.5mm. The right photo shows this soldered directly on a SMT component pair. One thing I found useful was to solder any other shields onto a stiff wire tied to the board ground. This provided the physical support for the tiny coax cables.
One thing I failed to do at this point was wire the hotplug detect wire - this caused me a lot of problems later.
Shockingly this level of soldering worked! I wired the power on the board to the back of the 5v off the USB-A connector on the laptop.
On power on the laptop shows a logo for a few seconds then it tries to boot the configured disk using a fairly normal UEFI. If it can't boot anything a dialog comes up asking you to select a device or go into setup; however if it does try and boot you may have to force bios entry. To force bios entry, start with the laptop turned off, touch the power button and then tap the escape key a few times until the bios comes up.
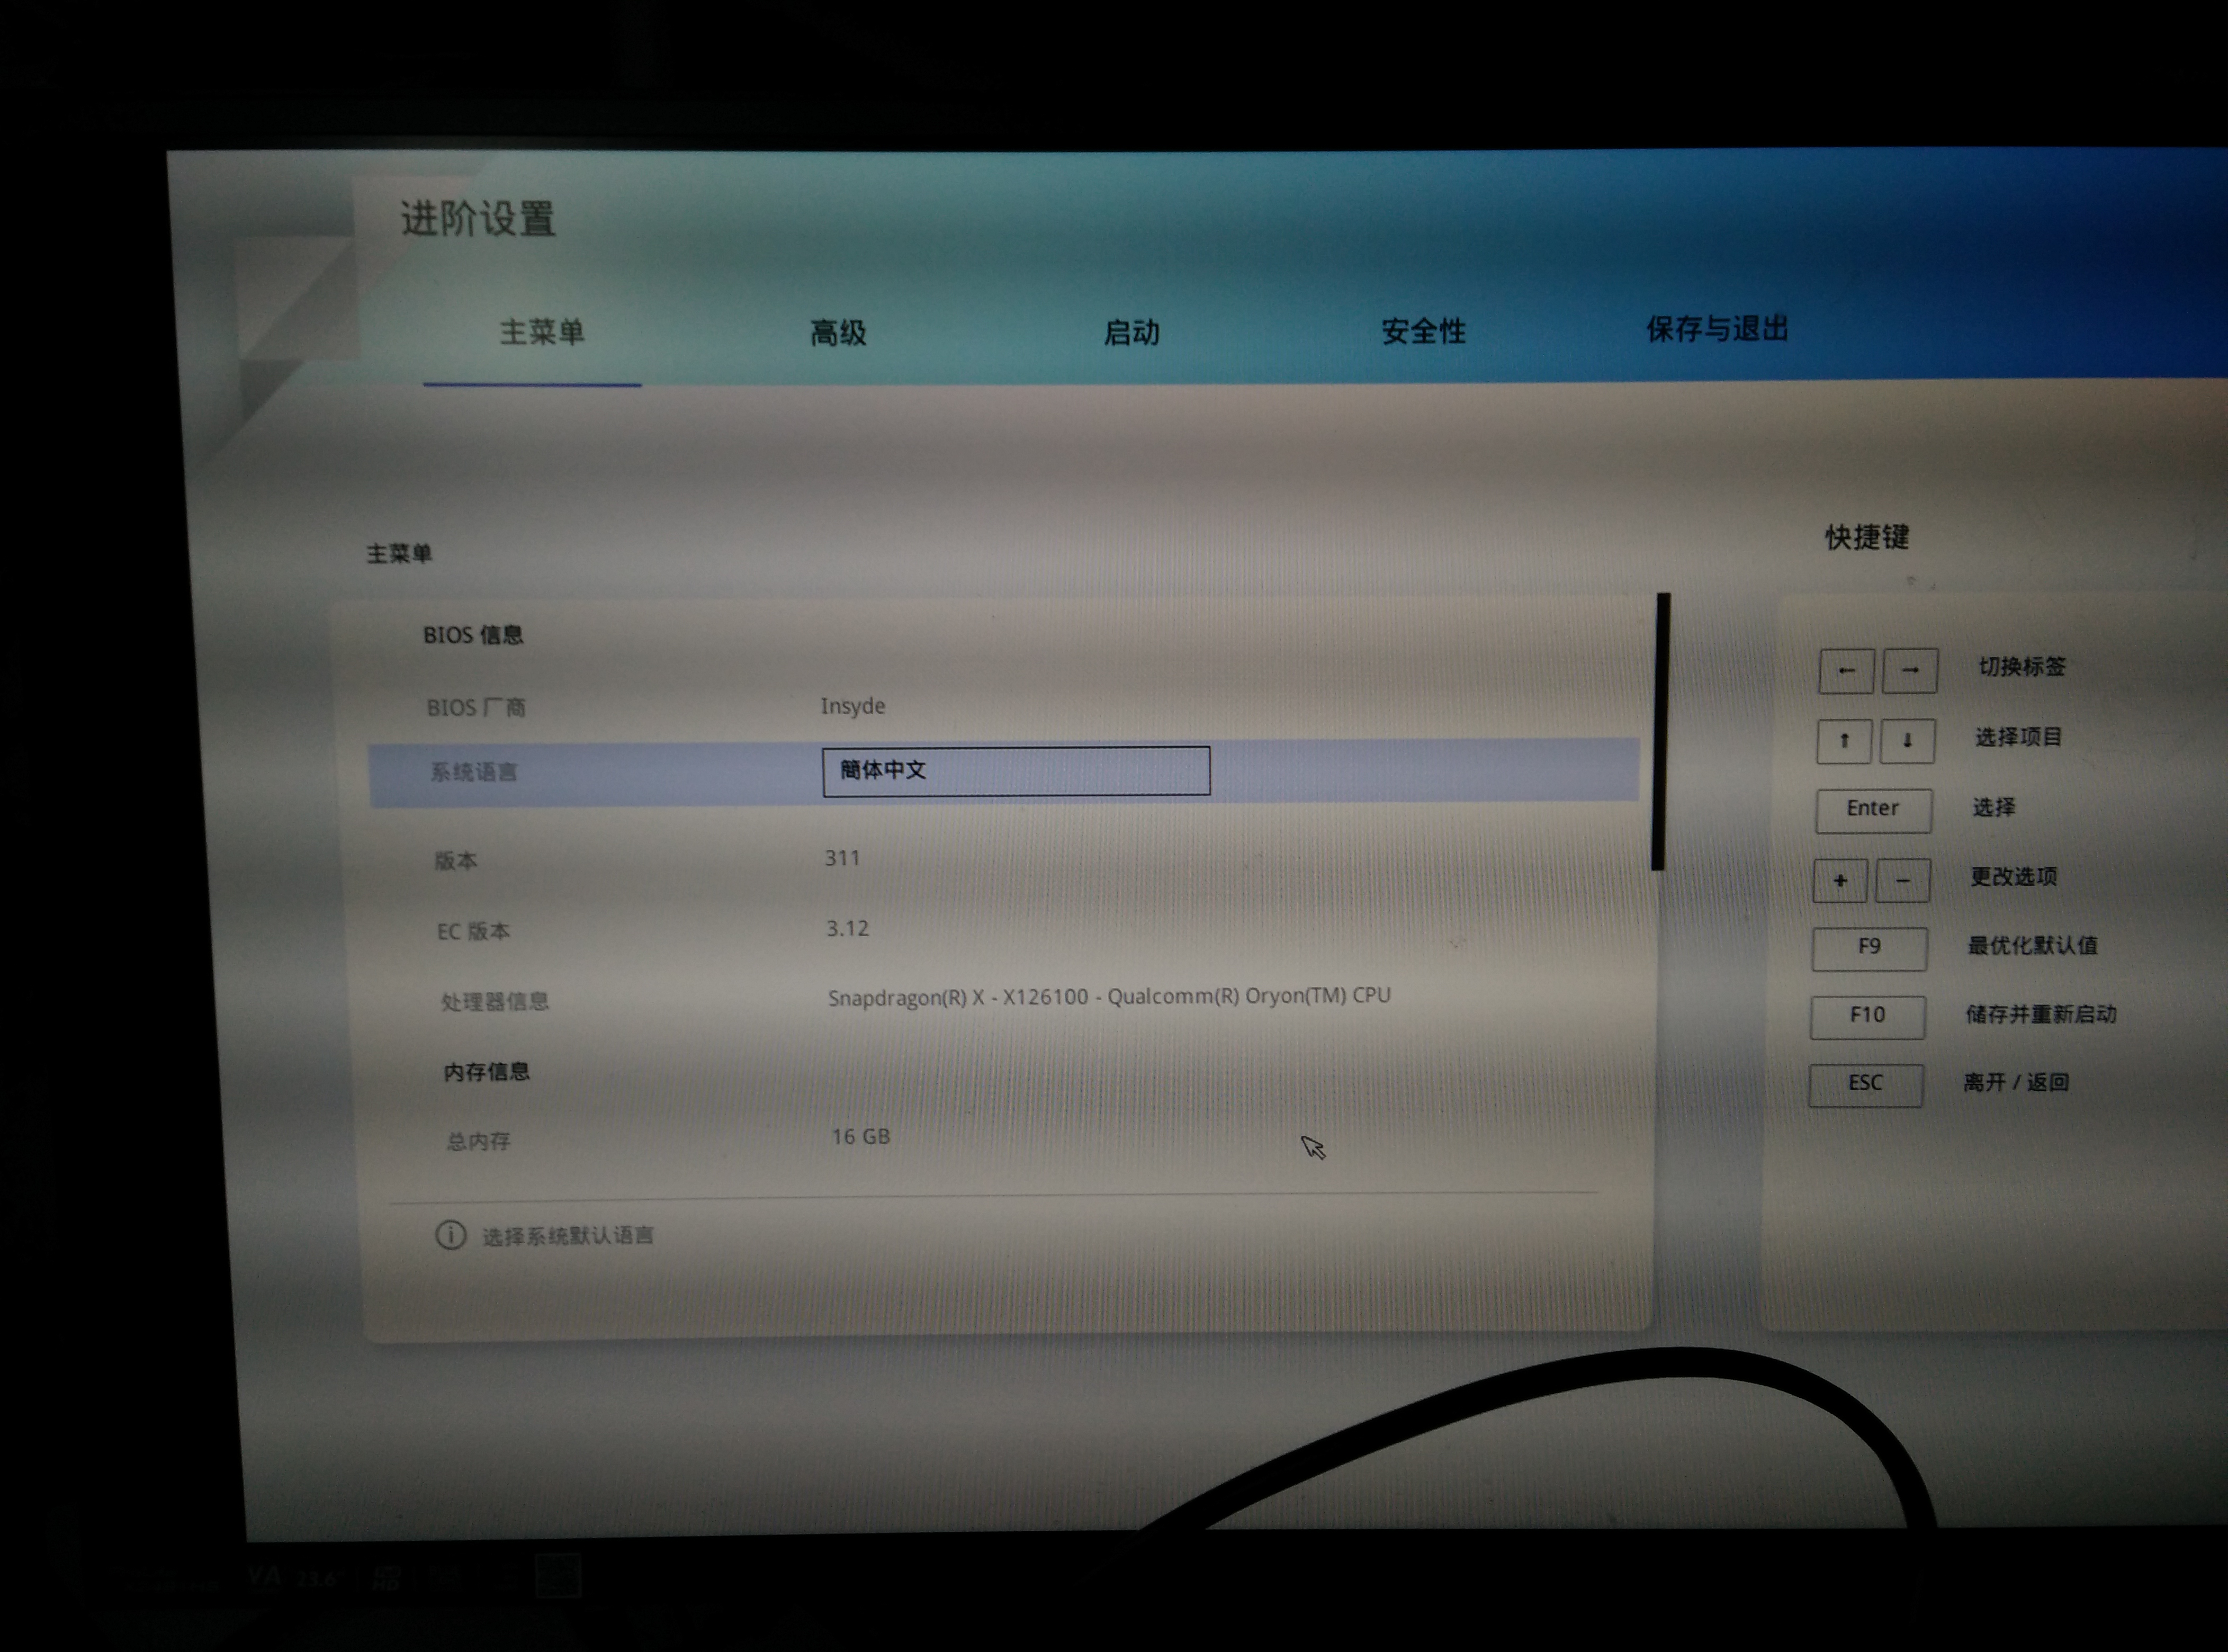
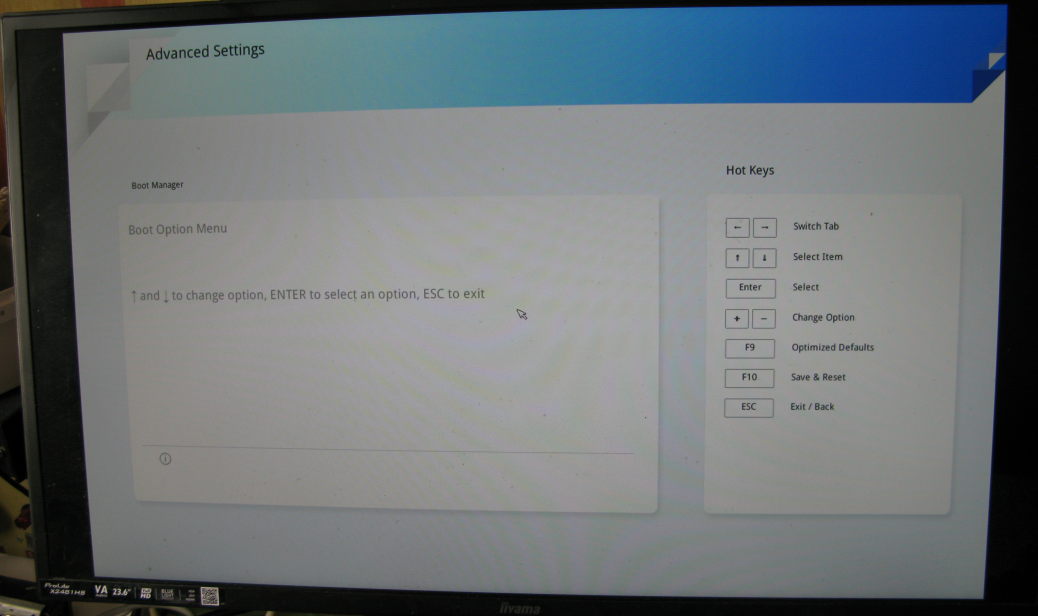
One of my machines had the BIOS in chinese, and using Google Translate managed to translate the options to find the language setting which is highlighted. I turned off secure boot and fast boot, and saved. This would now offer me the choice to boot a Linux image from the USB-A port.
These machines were both from an auction site, and someone had obviously tried to wipe the NVMe. One of them had an x86 Windows install, the other had some type of firmware image that didn't seem to match the machine. If yours comes with a Windows install it might be useful to keep it for extracting drivers etc. To reimage Windows onto it, there is a 'WiNRE' image on Asus site.
Arm laptops vary a lot more in their hardware than x86 and provide much less in the way of bios services to help the OS get going, as such each machine needs some tweaking to get it going. Even the variation among Snapdragon X laptops is large enough to need per-device tweaks.
Note, except where there's a data on an individual section below, this first boot was in April 2026. Stuff here is changing fast.
The first OS I tried booting was Debian arm trixie, and it got to Grub but then immediately rebooted.
But I found Ubuntu Concept which is a team working on Snapdragon X support, so my first reasonably successful boot was with Ubuntu Concept. I believe it should now work with mainline latest Ubuntu.
There is a specific Launchpad bug for this model of laptop. The '#aarch64-laptops' matrix channel (bridged to OFTC irc) are very helpful.
After getting it working with Concept, I moved the machine to Debian/sid but with my own kernel build, and a few of the hacks from Ubuntu copied over.
Trying to perform an install on a machine with no monitor and which you have no idea how well the boot works is tricky. Some of these problems might go away now that the HDMI port works on Linux, but when and if that gets enabled during boot is difficult to know. They would also be a lot easier if I'd wired the hpd pin up.
Since the machine also has no built in ether, and no serial (that I could find) remote consoles weren't available. Qualcomm does have a remote USB debug protocol that I have not yet tried. If the kernel boots some log messages normally appear (using EFIs boot framebuffer) before the kernel tries to load it's own drivers which may or may not then carry on displaying stuff. A server based install image might have been easier in some ways, but the ubuntu concept image is a desktop image.
The ubuntu install thumb image, once booting will resize the 3rd partition on the USB device and format it, and dump logs in there. This was really useful in initially seeing what was going on and confirming that the system had actually booted.
As mentioned above I hadn't connected the HPD line on the eDP converter, and thus while luckily the firmware worked, Linux got very upset. I reeducated the panel driver to ignore it and also removed an annoying warning that was being produced that I suspect was related.:
--- a/drivers/gpu/drm/panel/panel-edp.c
+++ b/drivers/gpu/drm/panel/panel-edp.c
@@ -848,7 +848,7 @@ static int panel_edp_probe(struct device *dev, const struct panel_desc *desc,
        panel->desc = desc;
        panel->aux = aux;

-       panel->no_hpd = of_property_read_bool(dev->of_node, "no-hpd");
+       panel->no_hpd = true; // DAG hack of_property_read_bool(dev->of_node, "no-hpd");
        if (!panel->no_hpd) {
                err = panel_edp_get_hpd_gpio(dev, panel);
                if (err)
--- a/drivers/gpu/drm/drm_vblank.c
+++ b/drivers/gpu/drm/drm_vblank.c
@@ -1326,7 +1326,7 @@ int drm_crtc_wait_one_vblank(struct drm_crtc *crtc)
                                 last != drm_vblank_count(dev, pipe),
                                 msecs_to_jiffies(1000));

-       drm_WARN(dev, ret == 0, "vblank wait timed out on crtc %i\n", pipe);
+       //DG hack drm_WARN(dev, ret == 0, "vblank wait timed out on crtc %i\n", pipe);

        drm_vblank_put(dev, pipe);
The display resolution and settings are now unknown to Linux, (and it reads the panel name as an 'LTM 0x9001'), I read the EDID from one of my existing 1920x1080 monitors, and put it in a monitor.edid which I put into the /usr/lib/firmware/edid directory, regenerated the initrd and then added the following to the command line via grub:
video=eDP-1:1920x1080 drm.edid_firmware=eDP-1:edid/monitor.edid
Before I managed to get the display working in Linux, I had managed to complete an Ubuntu install by using a cloud-init. Just using the logs that Ubuntu stores on the 3rd partition of the install USB device was enough to debug the cloud-init startup. By formatting a 2nd USB stick with a VFAT partition labelled cidata the Ubuntu installer will read the user-data file. Alas the desktop image I had didn't have sshd installed, so I had to add an entry to the file to install it:
#cloud-config
runcmd:
- [apt,update]
- [env,DEBIAN_FRONTEND=noninteractive,apt,install,-y,openssh-server ]
- [systemctl,start,openssh-server ]

chpasswd:
  expire: false
  users:
  - {name: ubuntu, password: dum12x4dum, type: text}
Note: I found that the main boot USB stick had to be in the right hand side USB-A socket, and then the drive with the cloud-init data could go in a hub hanging off one of the USB-C. (Also this section I have less notes on, you may need a grub entry to trigger nocloud cloud-init)
This got me an ssh into an installer image, albeit one that was trying to use a desktop.
While the basics boot OK with the Ubuntu install, there are a bunch of closed firmware chunks needed to get things like sound working. The qcom-firmware-extract package extracts this set of blobs from an existing Windows install. But since I didn't have a working Windows install, I eventually found the same components in the Board Support Package on Downloads page, extracted it with using 7z.
At the moment, the kernel work for the machine is still very much in flux. The tree from jglathe generally has a lot of the latest working stuff. A tree from Spiddy (currently on the spiddy/a14/jg-base or similar) has patches on top to make the cameras work.
I've got one of the machines, dragon, setup as with the EDP converter connected and running as a normal desktop. It's running Debian/Sid with KDE under wayland. It runs very well, mostly keeping various chat systems visible and for me hacking on random stuff. I've used it for video conferencing with both Jitsi and on Google Meet calls. The other machine, soup, is just sitting at the back with less occasional use at the moment. Dragon has its entire top lid removed, so is missing the wifi and bt antennae, but the camera is mounted on a little block of wood.
A normal boot on these machines can't run VMs, but there is a rather hacky way. One half of the ARM layered security system involves a stack of EL (exception levels). Normal user code runs at EL0, the OS (and EFI) at EL1, a hypervisor at EL2 and the firmware at EL3. These machines normally boot Linux at EL1 under Qualcomm\'s own hypervisor Gunyah. (Apparently the newer X2 CPUs run EFI at EL2 and things should be a bit better in theory).
To run a VM there are two choices: a) Tell Gunyah to create a VM for you, that's theoretically possible using Qualcomm's partially upstreamed Linux driver support and Qemu patches. Or b) MS wasn't interested in running under Gunyah, so has a key hidden somewhere that allows their code to boot in EL2, there's a hacky way that goes via this to then boot Linux.
The main special components here are:
I built the slbounce and qebspil, and found a copy of the tcblaunch.exe. All this stuff needs to go into the EFI partition (traditionally mounted in /boot/efi which is of course not just a directory of /boot). Thus /boot/efi has qebspilaa64.efi, slbounce.efi, sltest.efi, and tcblaunch.exe and a firmware directory. The firmware directory contains qcom/x1p42100/ASUSTek/zenbook-a14/ and under that the contents from /lib/firmware/updates and the same path.
I added a GRUB entry:
menuentry 'UEFI shell' $menuentry_id_option 'uefi-shell' {
        root=(hd0,gpt1)
        chainloader /EFI/BOOT/shellaa64.efi
}
and copied into /boot/efi/EFI/BOOT the shellaa64.efi binary from the Debian efi-shell-aa64 package. Then I created a startup.nsh in /boot/efi:
more /boot/efi/startup.nsh
echo "Welcome to daveel2"
stall 1000000
fs3:
cd ..
echo "Loading qebspilaa64"
load qebspilaa64.efi
echo "qebspilaa64 was loaded"
load slbounce.efi
echo "slbounce was loaded"
echo "Going grub"
pause
\EFI\ubuntu\grubaa64.efi
(Whether the fs3: is right for your machine is a bit difficult to guess!). This script has a stall and pause in it to let me recover if I accidentally land in this script, but as it turns out, the script only gets executed when I explicitly run the shellaa64.efi, not from a normal boot.
I then copied the x1p42100-asus-zenbook-a14-lcd-el2.dtb dtb file out of the kernel build dir into /boot/dtbs and made a new Grub entry. This grub entry (Debian el2) was copied from the standard Debian boot entry but pointed to that dtb file, and with the extra magic kernel parameters:
id_aa64mmfr0.ecv=1 arm-smmu.disable_bypass=0 iommu.strict=1
To boot into EL2 I can now select the EL2 shell from Grub, it does the switch, loads the firmware and then lands back into Grub, from where I can pick the Debian el2 option. This is a bit of a faff, but it's probably possible to load the EL2 kernel directly from that script instead of going back through Grub.
The machine has 3 USB ports, a USB-3 A on the right, and a pair of Type-C on the left that should be able to get to 40Gbps thunderbolt in theory. I started out with a couple of (different) USB-C hubs with ether and then on one machine have moved onto a USB-A based ether adapter since that frees one of the Type-C ports up.
Since I've got a pair of machines I'd really like to connect them quickly. Thunderbolt would be ideal.
Alas at the moment (July 2026), Thunderbolt doesn't work yet on these machines, and fails in a confusing way - using a Thunderbolt cable produces a failure that's weirder than using an older cable. A patch is just going in to disable it completely so it doesn't break on newer devices. Note that also the phrasing here is very mixed, so that USB4 is basically Thunderbolt 4 (with some minor spec differences) with some difference in spec guarantees, and in places the kernel says Thunderbolt and in others says USB4. It's not clear to me what the spec of the hardware is other than the 40G USB mark on the case.
Currently I have networking over the NCM USB gadget working, although only at about 3Gbps (which seems to be limited by saturating a CPU core, but I've not debugged further yet). It needs a small patch to the DT to enable port to work in device mode:
diff --git a/arch/arm64/boot/dts/qcom/x1-asus-zenbook-a14.dtsi b/arch/arm64/boot/dts/qcom/x1-asus-zenbook-a14.dtsi
index fbd998f68cae..a629ac186505 100644
--- a/arch/arm64/boot/dts/qcom/x1-asus-zenbook-a14.dtsi
+++ b/arch/arm64/boot/dts/qcom/x1-asus-zenbook-a14.dtsi
@@ -1692,7 +1692,9 @@ &usb_1_ss0_qmpphy {
 };

 &usb_1_ss0 {
-       dr_mode = "host";
+       dr_mode = "otg";
+       usb-role-switch;
+       role-switch-default-mode = "host";

        status = "okay";
 };
@@ -1722,7 +1724,9 @@ &usb_1_ss1_qmpphy {
 };

 &usb_1_ss1 {
-       dr_mode = "host";
+       dr_mode = "otg";
+       usb-role-switch;
+       role-switch-default-mode = "host";

        status = "okay";
 };
I use the following magic script on one end to instantiate the device. The UDC in here is the one which my machine shows for the frontmost port.
# From https://openwrt.org/docs/guide-user/hardware/usb_gadget with tweaks
# mount configfs
mount -t configfs none /sys/kernel/config
# load libcomposite module
modprobe libcomposite
# create a gadget
mkdir /sys/kernel/config/usb_gadget/ncm1
# cd to its configfs node
cd /sys/kernel/config/usb_gadget/ncm1
# configure it (vid/pid can be anything if USB Class is used for driver compat)
echo 0xda5e > idVendor
echo 0xda5e > idProduct
# configure its serial/mfg/product
mkdir strings/0x409
echo "dragon-net" > strings/0x409/serialnumber
echo "trebligorg"> strings/0x409/manufacturer
echo "linux-ncm" > strings/0x409/product
# create a config
mkdir configs/c.1
# configure it with attributes if needed
#echo 120 > configs/c.1/MaxPower
# ensure function is loaded
modprobe usb_f_ncm
# create the function (name must match a usb_f_<name> module such as 'ecm')
mkdir functions/ncm.0
# associate function with config
ln -s functions/ncm.0 configs/c.1
# enable gadget by binding it to a UDC from /sys/class/udc
echo "a800000.usb" > UDC
# to unbind it: echo "" UDC; sleep 1; rm -rf /sys/kernel/config/usb_gadget/ncm1
Note be careful to unbind the device before pulling the cable, I've seen a kernel panic when forgetting to.
Note the g_ncm module doesn't need that complex script which the usb_f_ncm needs, however g_ncm binds automatically to one UDC, which if your other Type-C port doesn't have a device plugged in, will be pot luck whether it gets the right port.
The llama.cpp llm engine is interesting to run LLMs locally. I wanted to try running it on the Snapdragons, although the 16GB of RAM is a bit mean for it.
There are essentially 3 ways, using the CPU, the GPU, or the NPU (which is really the Hexagon DSP in disguise).
Running on the CPU is just the same as on x86, nothing special there. The following command line worked reasonably using Gemma 4 and gets about 10 tokens/second output:
./build/bin/llama-cli --model ../unsloth-gemma-4-12b-it-Q4_K_M.gguf -t 8 -dev none --ctx-size 8192 --temp 1.0 --top-p 0.95 --top-k 64 --no-repack --reasoning-budget 0
There are two ways to use the GPU. Qualcomm apparently has a closed-source OpenCL build with some pre-constructed kernels which I've not tried. However, compiling llama with the Vulkan driver works trivially as well, although I've found it slower than just using the CPUs. There are suggestions that the Adreno GPU is just not well suited to LLM work.
Currently not working for me due probably to a firmware bug.
Hexagon is the CPU architecture of Qualcomm's DSP which is part of the snapdragon. There are at least two Hexagon's on a Snapdragon, the aDSP (which handles a lot of random system stuff and audio) and the cDSP which is intended for more compute. The cDSP has vector and matrix extensions that in theory are useful for LLM work (although on the Snapdragon X the DSP are apparently on a slower part of the bus).
Llama.cpp has some instructions in ./docs/backend/snapdragon which sounded promising, but it's a bit of a fight.
Qualcomm has their own forks of pretty much everything, but I've used upstream where possible in what I describe. Some things they haven't released source for at all.
By this point you'll already have a qccdsp8380.mbn binary in the firmware directory with the other firmware files; this contains a signed version of the QURT OS for the Hexagon cDSP. Another source for it is the Hexagon NPU Driver package for Windows. The 8380 seems to be core version specific, there are multiple versions of that binary all with the same name.
llama.cpp's build needs to build both it's C++ code for the aarch host and also kernels for the Hexagon. Qualcomm provides an SDK package. The tools in the SDK are built only for Windows (x86 and aarch) and Linux (x86 only). Thus while we could use them to do the hexagon part of the llama build on a different host, to build natively we need to build our own toolchain. However, we will need headers and shared libraries pre-built for the Hexagon side that they don't provide source for. I copied things on as-needed basis from the SDK into some dummy directories. I created a Hexagon/dummy-tools and Hexagon/dummy-sdk and pointed appropriate environment variables to them:
export HEXAGON_SDK_ROOT=/home/dg/hexagon/dummy-sdk
export HEXAGON_TOOLS_ROOT=/home/dg/hexagon/dummy-tools
export PATH=$HEXAGON_TOOLS_ROOT/Tools/bin:$PATH
Nothing seems to document which versions work with which versions of each other component either.
Note: The upstream llvm does not (yet?) have HMX (matrix) support, it does have HVX vector support. So that's all we can have so far if we want to use upstream.
I built git llvm df8b27d618d9. Having checked llvm out, I then checked out Qualcomm's eld linker from their git repo into llvm-project/eld. I used hash 9e74efb3ba55ad3f of eld. Both these versions were just chosen as ones that I got reasonably far with, new enough to have the HVX, but seeming to work together.
With the llvm and eld checked out like that, I ran the following cmake sequence in the top level of the llvm-project directory:
$ cmake -G Ninja -DCMAKE_BUILD_TYPE=Release -DCMAKE_INSTALL_PREFIX=/home/dg/llvm-build -DLLVM_ENABLE_ASSERTIONS:BOOL=ON -DLLVM_ENABLE_PROJECTS='llvm;clang' -DLLVM_EXTERNAL_PROJECTS=eld -DLLVM_EXTERNAL_ELD_SOURCE_DIR=${PWD}/eld -DLLVM_TARGETS_TO_BUILD='AArch64;Hexagon' -B ./build -S ./llvm
$ cmake --build build
$ cmake --install build
This gave me a nice build in ~/llvm-build/bin. Note: I used Release here because the Debug build failed.
I now add some links from my dummy SDK directories
~/hexagon/dummy-tools:
  2893169      0 lrwxrwxrwx   1 dg       dg             29 Jun 21 02:23 ./Tools/bin/hexagon-clang -> /home/dg/llvm-build/bin/clang
  2894180      0 lrwxrwxrwx   1 dg       dg             31 Jun 21 02:24 ./Tools/bin/hexagon-clang++ -> /home/dg/llvm-build/bin/clang++
From the Hexagon SDK I copy 6.6.0.0/tools/HEXAGON_Tools/19.0.07/Tools/target/hexagon/include and 6.6.0.0/tools/HEXAGON_Tools/19.0.07/Tools/target/hexagon/lib into dummy-tools/Tools/target/hexagon. Also, to the llvm-build directory I add a target symlink to /home/dg/hexagon/dummy-tools/Tools/target.
TODO: I copied some other stuff from the sdk into dummy-sdk - need to update
Finding a version of llama.cpp to build was tricky, I went with the fairly new commit 2d973636e292ee6f75fadcf08d29cb33511f509f from July 2026, but had to apply nasty hack to disable HMX and fix a few more compile flags.
The build needs the fastrpc library, which I installed from Debian's build.
With that patch in place building is done by:
export HEXAGON_SDK_ROOT=/home/dg/hexagon/dummy-sdk; export HEXAGON_TOOLS_ROOT=/home/dg/hexagon/dummy-tools
cmake -DCMAKE_C_COMPILER=gcc -DCMAKE_CXX_COMPILER=g++ -DHEXAGON_SDK_ROOT="$HEXAGON_SDK_ROOT" -DHEXAGON_TOOLS_ROOT="$HEXAGON_TOOLS_ROOT" -DGGML_HEXAGON=ON -DGGML_HEXAGON_FP32_QUANTIZE_GROUP_SIZE=128 -DPREBUILT_LIB_DIR=linux_aarch64 -B build-snapdragon
cmake --build build-snapdragon -j 8
Access to the cDSP is via the fastrpc mechanism which uses /dev/fastrpc-cdsp. You must have permission on that either by being a member of the appropriate group, or a chmod. (I've noticed that sometimes you need to redo the chmod).
Another firmware blob is needed to talk to fastrpc, this is the fastrpc_shell_unsigned_3 file from the ASuS package that contained the other DSP binaries. This should be copied into the /usr/share/hexagon-dsp/asus-zenbook-a14-ux3407qa/dsp/cdsp/ directory along with the .so files from the same directory in the BSP. I think this is the fastrpc endpoint running on QURT.
A simple test is:
export DSP_LIBRARY_PATH="$PWD/build-snapdragon/ggml/src/ggml-hexagon/;/usr/share/hexagon-dsp/asus-zenbook-a14-ux3407qa/dsp/cdsp"
dg@dragon:~/ai/llama.cpp$ ./build-snapdragon/bin/llama-cli --list-devices
Available devices:
  HTP0: Hexagon (0 MiB, 0 MiB free)
(No, I don't know why it's zero and if this is actually a problem)
Note: The current llama.cpp docs for Hexagon say that you have to use multiple HTP devices to get larger models in and says that you should have an HTP0,HTP1 etc - but this appears to have recently changed into one device that can handle larger models.
Errors often appear in both dmesg and in journalctl/syslog. The syslog messages generally seem more useful in terms of missing files that can be fixed. I often see errors about 'No context ID matches' - as far as I can tell this is the fallout after a failure rather than the cause. More logging can be enabled by creating a llama-cli.farf file with the contents 0xffff.
A full run should be possible with a line like:
./build-snapdragon/bin/llama-cli -m ../unsloth-gemma-4-12b-it-Q4_K_M.gguf -ngl 2 --ctx-size 8192 --temp 1.0 --top-p 0.95 --top-k 64 -t 6 -fa on --no-repack --reasoning-budget 0 --reasoning off -dev HTP0
I'm currently stuck on a 'fastrpc_mem.c:707: Error 0xe: remote_mmap64_internal failed for fd 0xc of size 262144 (flags 0x0, vaddrin 0xffff7dd00000) errno Invalid argument' error that I believe to be this bug.
In theory that should be fixed by a newer version of the cdsp.mbn, and there is an unsigned version in Linux firmware, which it might be possible to load on an EL2 boot.
I've got a couple of different USB-C hubs with ether, both work OK although I've found they occasionally don't start up without hot plugging them after boot. (Both reporting an error -71 in the logs)
The x1e-ec-tool can be used to set the fan mode and speed, although I've not managed to make it control the keyboard backlight on my machine. There is a kernel EC module now that I am yet to try.
dg@dragon:~$ lscpu
Architecture:                aarch64
  CPU op-mode(s):            64-bit
  Byte Order:                Little Endian
CPU(s):                      8
  On-line CPU(s) list:       0-7
Vendor ID:                   Qualcomm
  Model name:                Oryon
    Model:                   1
    Thread(s) per core:      1
    Core(s) per cluster:     8
    Socket(s):               -
    Cluster(s):              1
    Stepping:                0x2
    Frequency boost:         disabled
    CPU(s) scaling MHz:      44%
    CPU max MHz:             2956.8000
    CPU min MHz:             710.4000
    BogoMIPS:                38.40
    Flags:                   fp asimd evtstrm aes pmull sha1 sha2 crc32 atomics fphp asimdhp cpuid asimdrdm jscvt fcma lrcpc dcpop sha3 sm3 sm4 asimddp sha5
                             12 asimdfhm dit uscat ilrcpc flagm ssbs sb paca pacg dcpodp flagm2 frint i8mm bf16 rng bti ecv afp rpres
NUMA:
  NUMA node(s):              1
  NUMA node0 CPU(s):         0-7
Vulnerabilities:
  Gather data sampling:      Not affected
  Ghostwrite:                Not affected
  Indirect target selection: Not affected
  Itlb multihit:             Not affected
  L1tf:                      Not affected
  Mds:                       Not affected
  Meltdown:                  Not affected
  Mmio stale data:           Not affected
  Old microcode:             Not affected
  Reg file data sampling:    Not affected
  Retbleed:                  Not affected
  Spec rstack overflow:      Not affected
  Spec store bypass:         Mitigation; Speculative Store Bypass disabled via prctl
  Spectre v1:                Mitigation; __user pointer sanitization
  Spectre v2:                Mitigation; CSV2, BHB
  Srbds:                     Not affected
  Tsa:                       Not affected
  Tsx async abort:           Not affected
  Vmscape:                   Not affected
dg@dragon:~$ lspci
0004:00:00.0 PCI bridge: Qualcomm Technologies, Inc SC8380XP PCIe Root Complex [Snapdragon X / X Plus / X Elite]
0004:01:00.0 Network controller: Qualcomm Technologies, Inc QCNFA765 Wireless Network Adapter (rev 01)
0006:00:00.0 PCI bridge: Qualcomm Technologies, Inc SC8380XP PCIe Root Complex [Snapdragon X / X Plus / X Elite]
0006:01:00.0 Non-Volatile memory controller: Micron Technology Inc 2500 NVMe SSD (DRAM-less) (rev 01)
mail: fromwebpage@treblig.org irc: penguin42 on libera.chat | matrix: penguin42 on matrix.org | mastodon: penguin42 on mastodon.org.uk